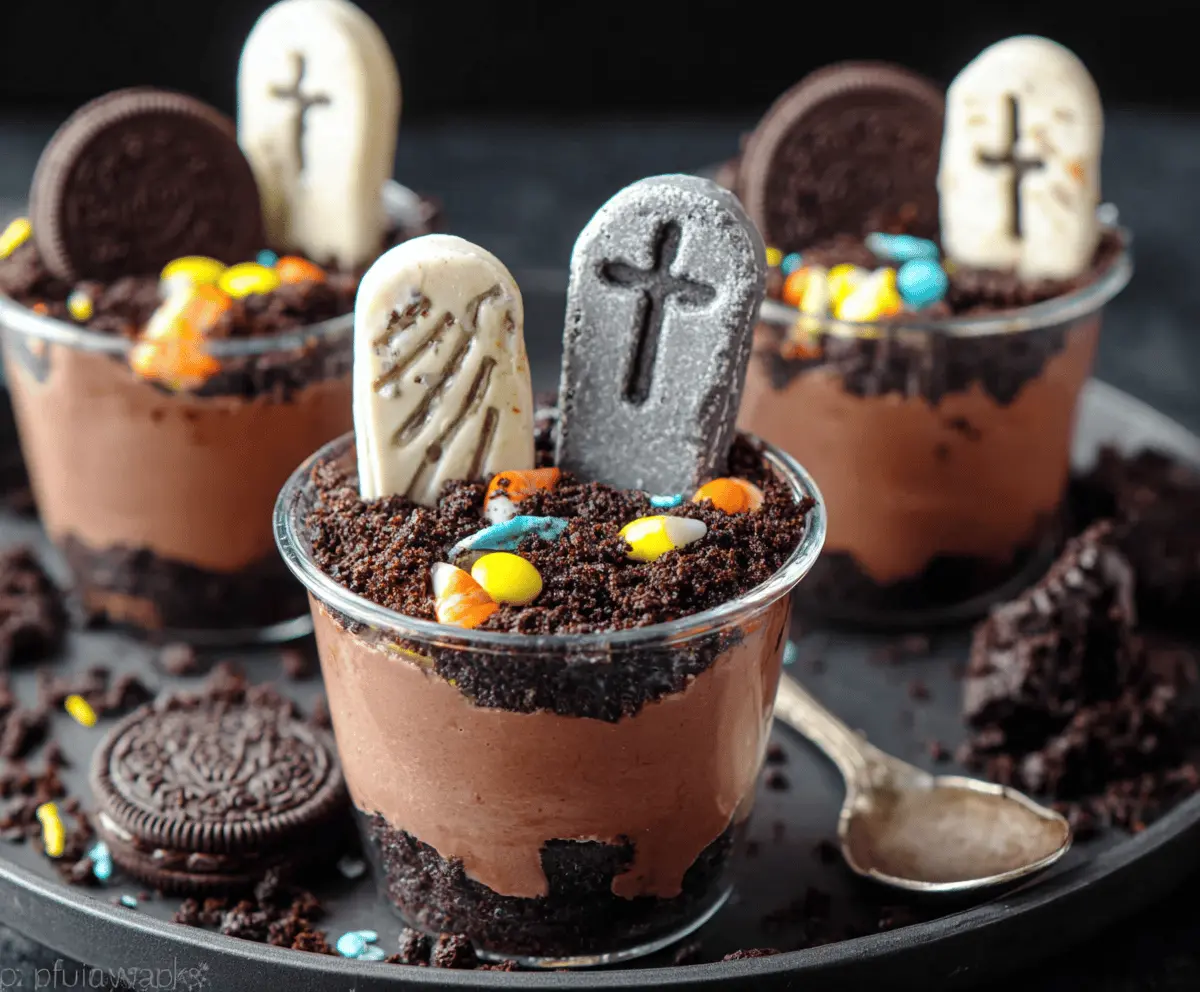
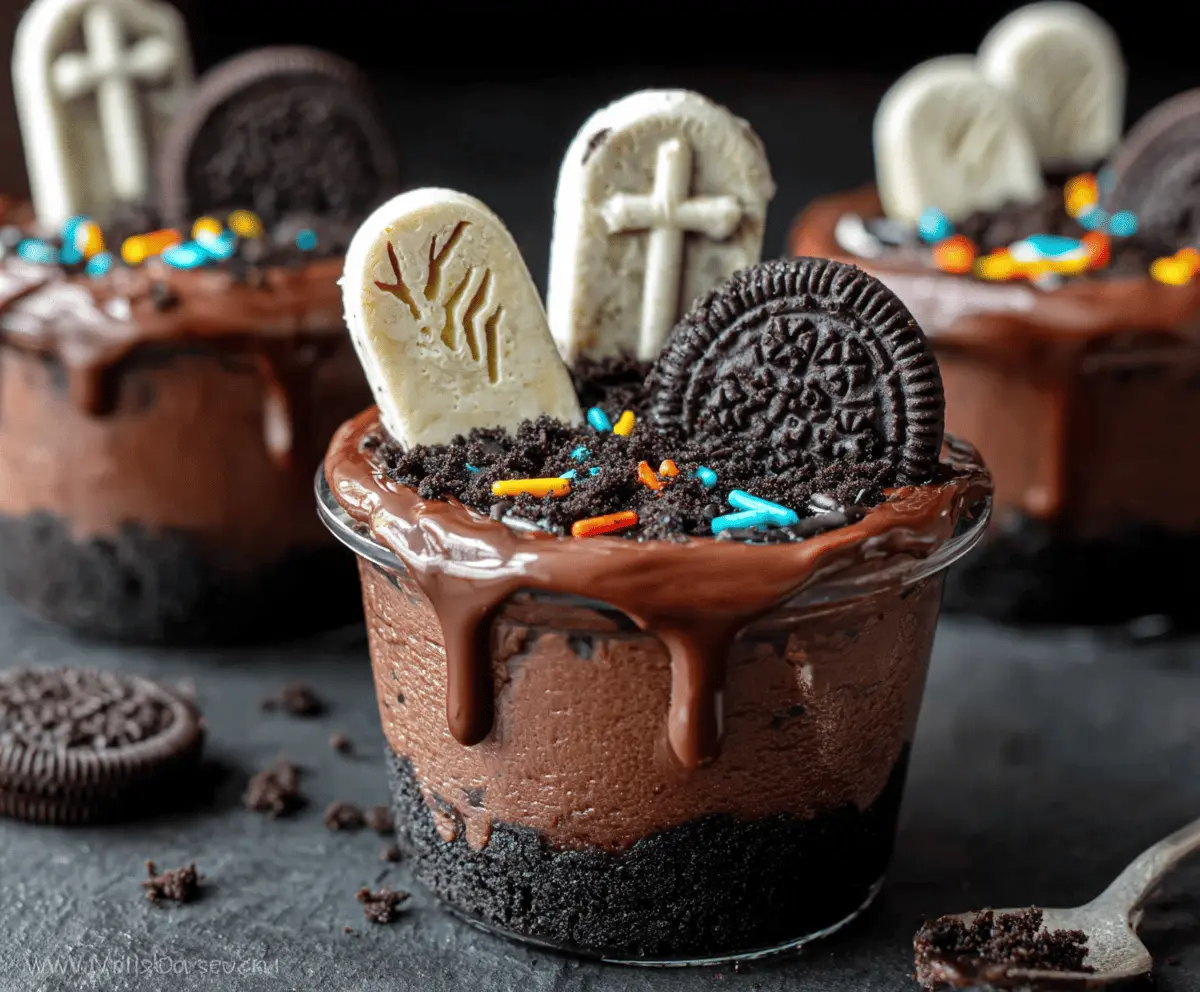
These Graveyard Chocolate Pudding Cups are a fun and spooky treat! Made with rich chocolate pudding, crushed cookie “dirt,” and gummy worms, they are perfect for Halloween parties.
Kids and adults alike love the creepy yet delicious look of these cups. I get a kick out of watching everyone dig in—who can resist? Just don’t get too close to the worms! 😂
Key Ingredients & Substitutions
Oreo Cookies: These serve as the base for “dirt.” If you can’t find Oreos, chocolate graham crackers or any chocolate cookies will work nicely, too. Just crush them up in the same way!
Instant Chocolate Pudding: Instant pudding gives the dessert its creamy texture without needing to cook. If you prefer vanilla, feel free to use vanilla pudding for a different flavor base, adding cocoa powder for chocolate flavor.
Whipped Topping: I recommend using Cool Whip for ease. You can substitute it with homemade whipped cream, though you may want to sweeten it slightly.
Coconut Oil: This helps the chocolate drizzle set perfectly. Vegetable oil is a good alternative if you prefer not to use coconut oil.
Candy Decorations: Candy tombstones are fun, but you can use chocolate or gummy candies as substitutes. You could even make homemade brownies and cut them into shapes!
How Do I Get the Perfect Chocolate Drip?
The chocolate drip adds a fun visual to your cups, but it can be tricky! Here’s how to get it spot-on:
- Use a microwave-safe bowl to melt the chocolate chips with coconut oil in short bursts, stirring often. This prevents burning.
- Once melted, let it cool slightly before applying it to the cups. If it’s too hot, it won’t hold its shape when it drips.
- Use a spoon or piping bag to carefully drizzle the chocolate around the rim of each cup. Let it drip naturally down the sides for that spooky effect.
Remember to have fun with this step! You can’t go wrong with a little mess when it comes to Halloween treats!
Graveyard Chocolate Pudding Cups
Ingredients You’ll Need:
For the Base:
- 1 package (14.3 oz) Oreo cookies (about 36 cookies)
- 4 cups cold milk
For the Pudding Layer:
- 2 packages (3.9 oz each) instant chocolate pudding mix
- 1 tub (8 oz) whipped topping, thawed (like Cool Whip)
For the Chocolate Drip:
- 1 cup semi-sweet chocolate chips
- 1 tbsp coconut oil or vegetable oil
For the Decoration:
- Candy tombstones or Halloween-themed candy decorations
- Halloween colored sprinkles (orange, blue, etc.)
How Much Time Will You Need?
This recipe takes about 30 minutes to prepare and 1 hour to chill, making it a great last-minute Halloween dessert. The prep includes making the pudding, assembling the cups, and letting them set in the fridge. Your spooky treat will be ready in no time!
Step-by-Step Instructions:
1. Prepare Oreo “Dirt” Crust:
Start by putting the Oreo cookies in a zip-top bag and crush them into fine crumbs using a rolling pin. If you have a food processor, that works great too! Once crushed, set aside about 2 tablespoons of the crumbs for topping later. The rest will be used to create the crust in your cups.
2. Make Pudding:
In a large bowl, whisk together the cold milk and the instant chocolate pudding mixes. Continue whisking for about 2 minutes until the mixture thickens. Let it sit for a few minutes to reach pudding consistency.
3. Fold in Whipped Topping:
Take the thawed whipped topping and gently fold it into the chocolate pudding until the mixture is smooth and well combined. This will give your pudding a light and fluffy texture!
4. Assemble Cups:
Grab your serving cups or jars, and spoon a generous layer of the crushed Oreo crumbs into the bottom of each one. Press down lightly to form a solid crust that will hold up the layers.
5. Add Pudding Mixture:
Now, add the chocolate pudding mixture on top of the Oreo crust in each cup. Use a spoon to smooth out the surface for a nice look. It should look delicious already!
6. Make Chocolate Drip:
In a microwave-safe bowl, melt the chocolate chips with the coconut oil using 30-second intervals. Stir in between to ensure it melts evenly. Once melted and smooth, use a spoon or a piping bag to create a chocolate drip around the rim of each cup, allowing it to drip down the sides like a spooky decoration!
7. Add Toppings:
Sprinkle the reserved Oreo crumbs on top of the pudding and chocolate drip. Then, place your candy tombstones or other Halloween-themed candy decorations on top. Finally, add colorful sprinkles for that festive flair!
8. Chill:
Cover the cups and place them in the refrigerator. Let them chill for at least 1 hour to allow the flavors to meld and everything to set.
9. Serve:
Once chilled, take the cups out of the fridge, and they’re ready to enjoy! Dig in and let the spooky fun begin with your delicious Graveyard Chocolate Pudding Cups!
This fun, layered dessert combines creamy chocolate pudding with crunchy Oreo crumbs and festive decorations for a perfect Halloween treat!
Can I Use Different Types of Cookies for the Crust?
Absolutely! If you’re not a fan of Oreos, you can use chocolate graham crackers or any chocolate-flavored cookies. Just crush them up the same way, and you’ll get a tasty crust!
Can I Make the Pudding Cups Dairy-Free?
Yes, you can! Use dairy-free milk (like almond, soy, or oat milk) and pick a dairy-free whipped topping. There are also dairy-free chocolate pudding mixes available that work great in this recipe.
How Long Can I Store Leftovers?
Leftover pudding cups can be stored in the refrigerator for up to 3 days. Just make sure they’re covered tightly to keep them fresh. If they separate a bit, just give them a gentle stir before serving!
Can I Make These Ahead of Time?
Yes, you can prepare these pudding cups a day in advance! Assemble everything except for the chocolate drip, cover them, and refrigerate. When you’re ready to serve, add the chocolate drizzle and decorations just before serving for the best presentation.