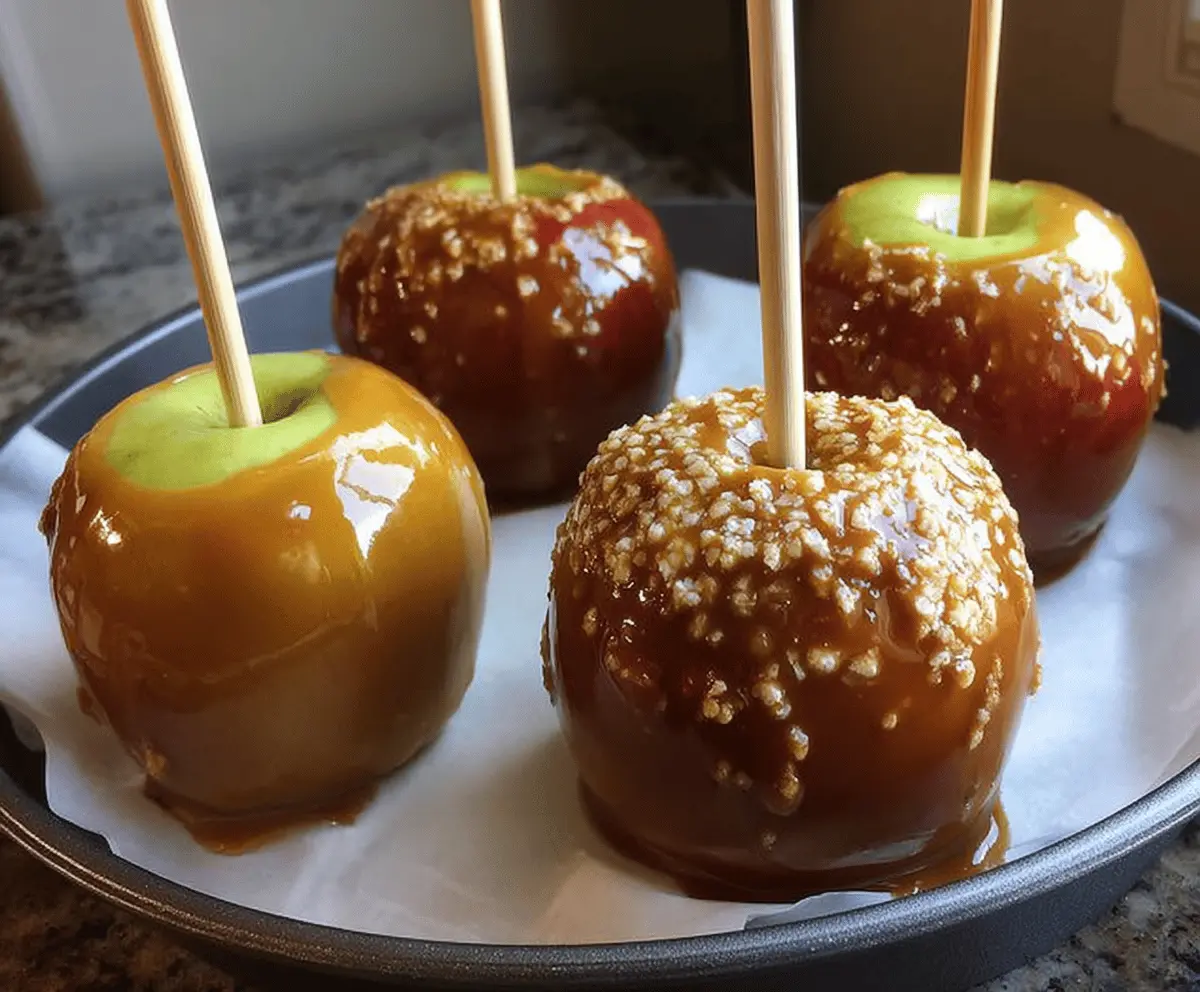
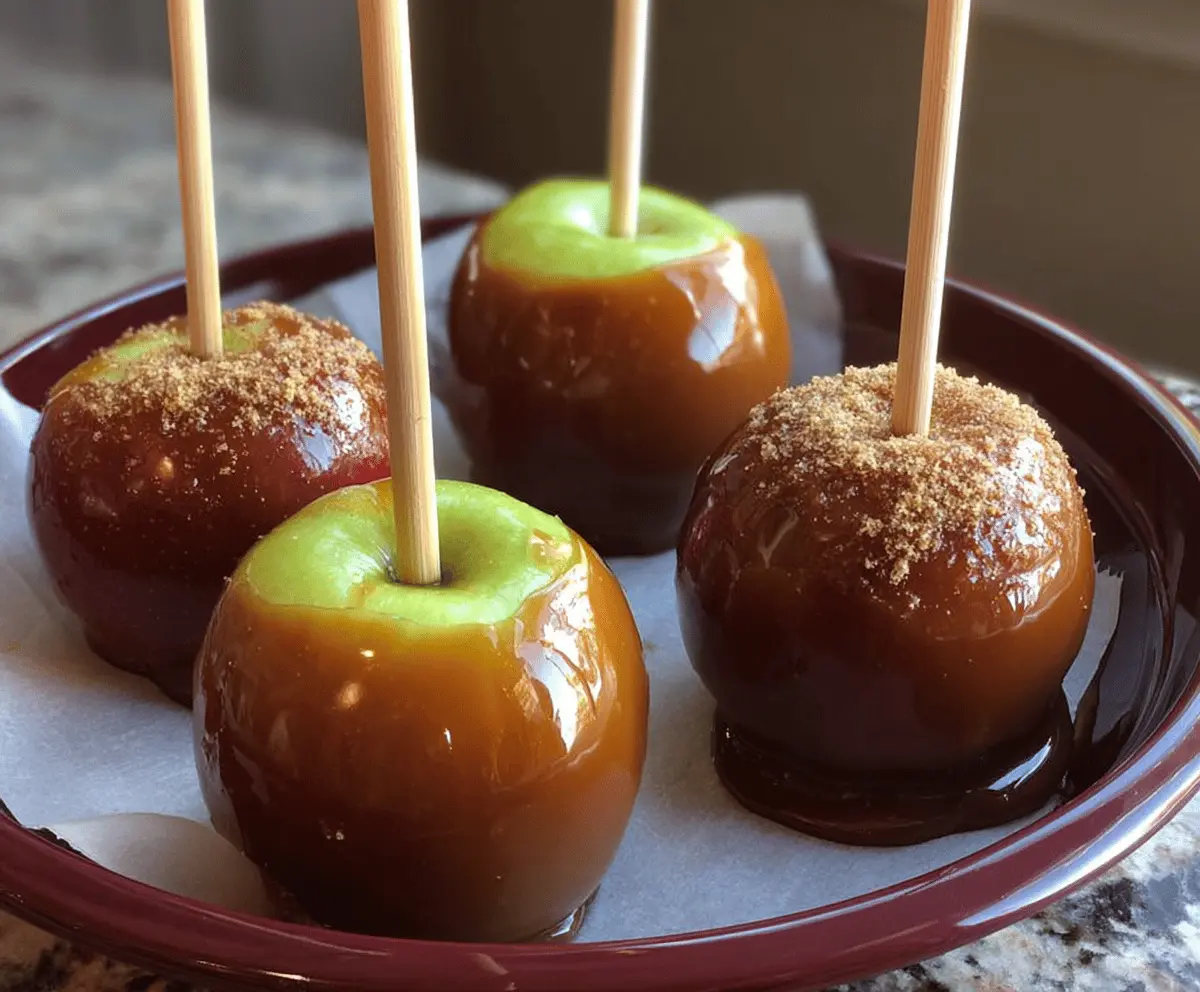
These gluten-free caramel apples are a sweet and sticky treat perfect for fall! Fresh apples are coated in smooth, creamy caramel that’s simply irresistible.
Making this treat is a fun way to enjoy family time. Plus, who can resist that gooey caramel? Just be careful, it can get a little messy—good thing it’s delicious! 🤭
Key Ingredients & Substitutions
Apples: Granny Smith apples add a nice tartness that contrasts beautifully with sweet caramel. If you prefer sweeter apples, Fuji or Honeycrisp work well too. Just remember to choose firm apples for better dipping!
Caramel Candies: Look for gluten-free caramel candies at the store, but double-check labels to be sure. If you’re feeling adventurous, you can make homemade caramel using sugar, cream, and butter instead! Just keep the gluten-free requirement in mind.
Butter: Unsalted butter is my go-to for this recipe. However, if you’re dairy-free, you can swap this out with coconut oil or a dairy-free butter substitute!
Cream: Heavy cream helps thicken the caramel. For a dairy-free option, use coconut cream—it adds a lovely flavor!
Toppings: Gluten-free graham cracker crumbs or crushed cookies are great for extra crunch! You can also use crushed nuts or sprinkles if you want to mix it up.
How Can You Get the Caramel to Stick Perfectly?
Getting that caramel to stick just right can be tricky! Here’s how to make it easier:
- Make sure the apples are really dry before dipping. Any moisture can prevent the caramel from sticking well.
- Use a heavier coating of caramel for better coverage. After dipping, let any excess drip off back into the pot.
- If it’s your first time, practice with just one apple. Once you get the hang of it, you can go for more!
- Let the dipped apples sit at room temperature for about 30 minutes or pop them in the fridge for quicker setting. This helps the caramel firm up properly.
How to Make Gluten Free Caramel Apples
Ingredients You’ll Need:
For the Caramel Apples:
- 4 medium green apples (Granny Smith work well)
- 16 oz (450 g) gluten-free caramel candies or squares
- 2 tbsp unsalted butter
- 2 tbsp heavy cream or coconut cream
- 1 tsp vanilla extract (optional)
- Wooden sticks or skewers
For Topping (Optional):
- Gluten-free graham cracker crumbs or crushed gluten-free cookies
- Parchment paper or wax paper for setting
How Much Time Will You Need?
This recipe requires about 15 minutes of preparation time and an additional 30 minutes to let the caramel set. You can easily whip these up for a fun treat!
Step-by-Step Instructions:
1. Prepare Your Apples:
Start by washing and thoroughly drying the apples. Make sure they’re nice and clean, as any moisture can prevent the caramel from sticking. Remove the stems and insert a wooden stick into the top center of each apple, pushing about halfway down into the flesh to give a good grip. This will make dipping easier!
2. Get Your Space Ready:
Line a baking sheet with parchment paper or wax paper. This is where your caramel apples will set, so make sure it’s ready before you start dipping.
3. Melt the Caramel:
In a medium saucepan, combine the gluten-free caramel candies, butter, and heavy cream. Heat this mixture over low to medium heat, stirring constantly until the caramel is fully melted and smooth. Take care not to let it boil!
4. Mix in Vanilla:
If you want to add a little extra flavor, stir in the vanilla extract after the caramel is melted and smooth. This is optional but highly recommended for a tasty twist!
5. Dip Your Apples:
Now, holding an apple by the stick, dip it into the melted caramel. Turn the apple to coat it completely in caramel, then let any excess caramel drip off. Make sure each apple gets a good coverage!
6. Add Toppings:
Place the coated apple onto the prepared baking sheet. If you like, sprinkle the top of the caramel apple with gluten-free graham cracker crumbs or crushed cookies right after dipping, while the caramel is still warm.
7. Repeat and Let Set:
Repeat this process for all the apples. Once they are all dipped and topped, let them set at room temperature for at least 30 minutes. If you’re in a hurry, you can place them in the refrigerator to speed up the setting process.
8. Ready to Serve:
Once the caramel has firmed up, your gluten-free caramel apples are ready to enjoy! Store any leftovers in the refrigerator for up to 3 days, if they last that long!
Enjoy your delicious gluten-free caramel apples! 🍏🍬
Can I Use Other Types of Apples for This Recipe?
Absolutely! While Granny Smith apples are ideal for their tartness, you can also use Fuji or Honeycrisp apples for a sweeter treat. Just make sure to choose firm apples for the best results!
How Do I Make the Caramel Stick Better?
To help the caramel stick, make sure your apples are completely dry before dipping. Additionally, dipping them while the caramel is still warm and allowing excess to drip off will create a thicker coating. Let them set at room temperature for the best adhesion!
Can I Prepare These Ahead of Time?
Yes, you can! Prepare the caramel apples and refrigerate them up to 3 days in advance. Just be aware that the longer they sit, the softer the caramel may become. Enjoy them fresh for the best texture!
How Should I Store Leftovers?
Store any leftover caramel apples in an airtight container in the refrigerator for up to 3 days. If you notice the caramel softening, simply pop them into the fridge to firm them back up before serving!