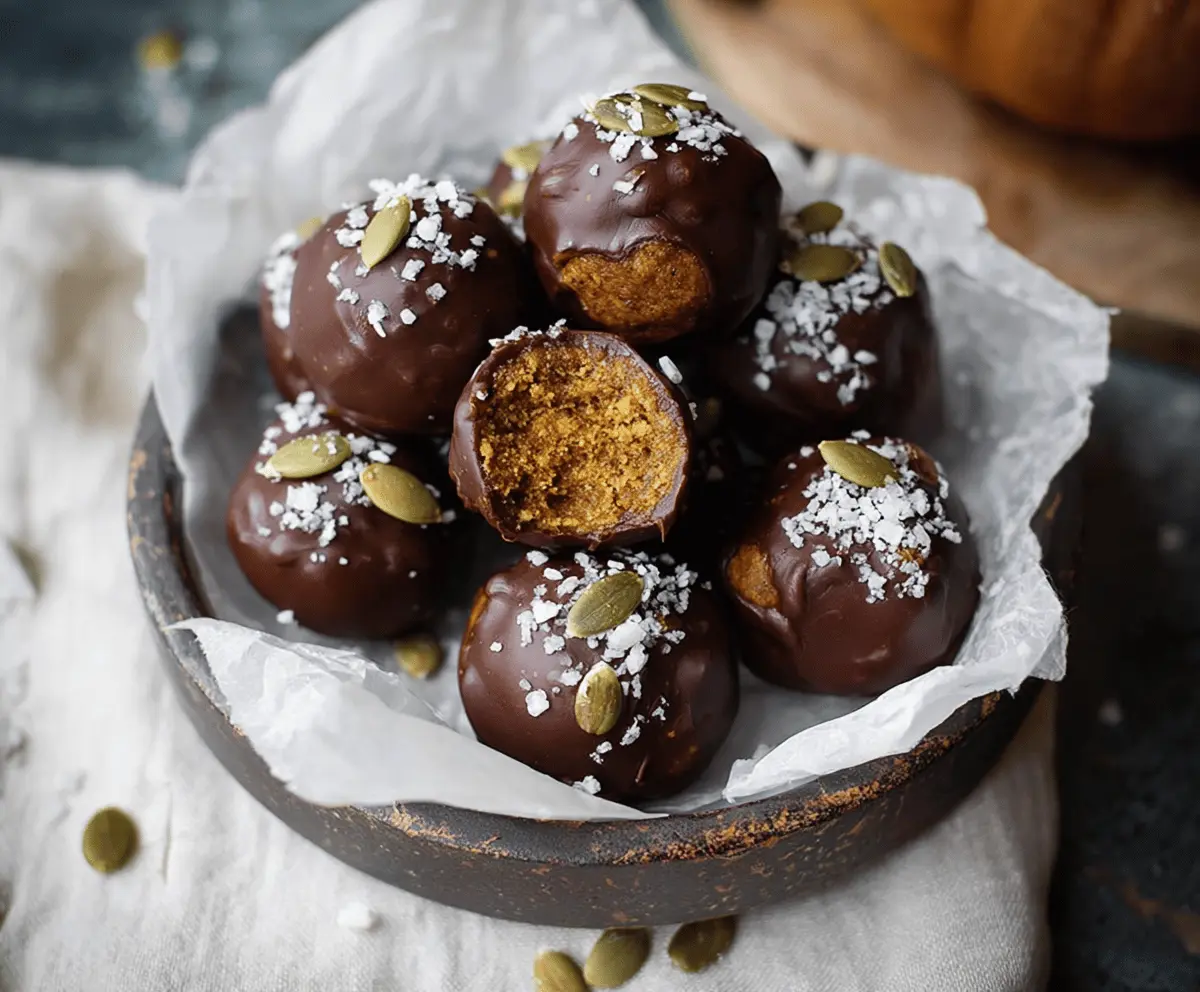
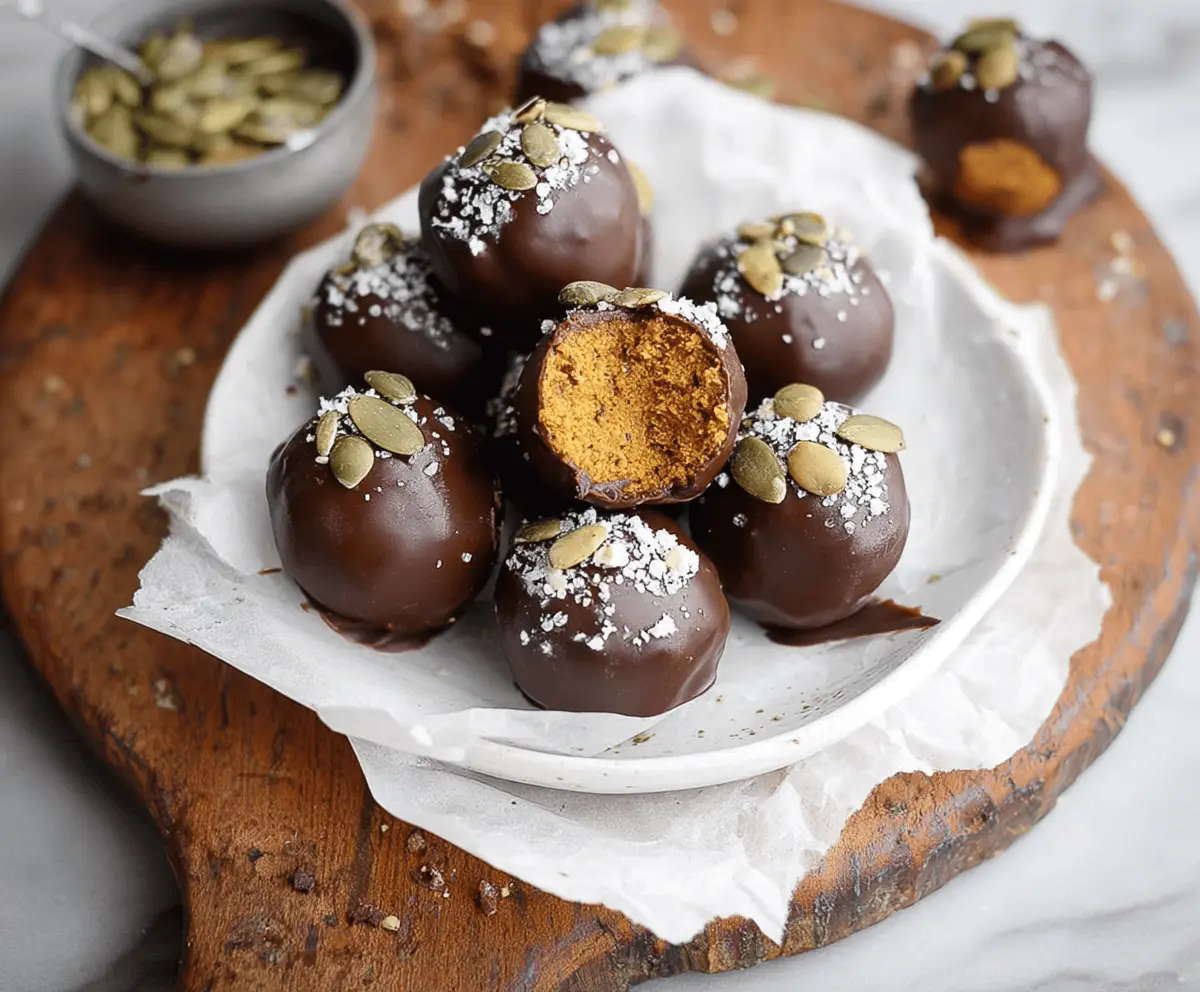
These Chocolate Covered Pumpkin Protein Balls are the perfect snack! They’re made with creamy pumpkin, chocolate, and protein for a tasty boost during your day.
They’re like little chocolate hugs for your taste buds! I love making a batch and hiding them away for a quick treat after workouts. Just don’t tell anyone my secret stash! 😄
They’re super simple to whip up—a no-bake treat! I often enjoy them with a glass of almond milk. Trust me, you’ll want to keep these on hand!
Key Ingredients & Substitutions
Pumpkin Puree: Make sure to use pure pumpkin puree and not pumpkin pie filling, as the filling contains added sugars and spices. If you’re in a bind, you could use mashed sweet potatoes for a similar texture and flavor.
Flour: Almond flour gives a nutty flavor and is low-carb, but you can swap it with oat flour for a gluten-free option. Regular all-purpose flour works too if you don’t have dietary restrictions!
Protein Powder: Vanilla protein powder is my go-to for flavor. If you prefer plant-based options, try pea or hemp protein. You could also omit it, but the texture may change slightly.
Maple Syrup/Honey: Both work well for sweetness. If you want a sugar-free option, consider using stevia or erythritol for a lower-calorie choice.
Chocolate: I recommend using dark chocolate (70% cocoa or higher) for a richer flavor. If you’re looking for a dairy-free version, try dairy-free chocolate chips. Milk chocolate can be a sweeter alternative but may overpower the pumpkin flavor.
How Do I Perfectly Coat the Balls in Chocolate?
Coating the pumpkin balls in chocolate can be tricky, but here’s how to get it just right!
- First, melt the chocolate and coconut oil together until smooth. This makes it easier to coat the balls.
- When dipping, you can use a fork or a toothpick. Insert the toothpick into the ball, then dip it into the chocolate.
- Let excess chocolate drip off before placing them back on parchment paper.
- For a decorative touch, sprinkle quickly with pumpkin seeds and sea salt before the chocolate sets.
Chilling the coated balls will help the chocolate firm up nicely. Enjoy your treats knowing they’ve got that perfect chocolate shell!
Chocolate Covered Pumpkin Protein Balls
Ingredients You’ll Need:
For the Protein Balls:
- 1 cup pumpkin puree (not pie filling)
- 1 ½ cups almond flour or oat flour
- 1/4 cup vanilla protein powder
- 2 tbsp maple syrup or honey
- 1 tsp pumpkin pie spice
- 1/2 tsp cinnamon
- 1/4 tsp salt
For the Chocolate Coating:
- 6 oz dark chocolate (70% cocoa or higher), chopped or chips
- 1 tsp coconut oil (optional, for smoothing the chocolate)
For Garnish:
- Pumpkin seeds
- Sea salt flakes
How Much Time Will You Need?
This delightful recipe takes about 15 minutes to prepare, plus 30 minutes of freezing time for the protein balls. After that, you’ll need an additional 15 minutes to dip them in chocolate and allow them to set. All in all, you can expect to spend about 1 hour making these delicious snacks!
Step-by-Step Instructions:
1. Combine the Ingredients:
In a large mixing bowl, combine the pumpkin puree, maple syrup (or honey), pumpkin pie spice, cinnamon, and salt. Stir everything together until the mixture is smooth and well mixed. This will be the base of your protein balls!
2. Make the Dough:
Now, add in the almond flour (or oat flour) and the vanilla protein powder. Mix it together until a thick dough forms. It should be firm enough that you can easily roll it into balls. If your mixture feels a little wet, you can add a bit more flour to get the right consistency.
3. Shape the Protein Balls:
Using your hands or a small cookie scoop, roll the dough into balls about 1 inch in size. Place each ball onto a parchment-lined baking sheet. Once you have rolled all the dough, it’s time to chill!
4. Chill in the Freezer:
Pop the baking sheet in the freezer for about 30 minutes. This will help the protein balls firm up nicely, making them easier to dip in chocolate later.
5. Melt the Chocolate:
While the balls are chilling, melt the dark chocolate along with the coconut oil (if you’re using it) in a microwave-safe bowl. Heat in 30-second intervals, stirring in between each interval until the chocolate is completely smooth and melted.
6. Dip the Balls:
After the protein balls have chilled, take them out of the freezer. Using a fork or a toothpick, dip each ball into the melted chocolate, allowing any excess to drip off. Place the coated balls back onto the parchment paper and repeat until all are coated.
7. Add the Finishing Touches:
While the chocolate is still melted, quickly sprinkle pumpkin seeds and a pinch of sea salt flakes onto each chocolate-covered ball for a fun garnish!
8. Set and Store:
Refrigerate the coated protein balls for at least 15 minutes, so the chocolate can set properly. Once set, you can keep them in an airtight container in the refrigerator for up to 1 week or freeze them for future snacking!
Enjoy your delicious and nutritious Chocolate Covered Pumpkin Protein Balls as a perfect snack or post-workout treat. They’re packed with flavor and a great energy booster!
Can I Use Canned Pumpkin?
Absolutely! Canned pumpkin puree is perfect for this recipe. Just make sure it’s plain pumpkin puree and not pumpkin pie filling, as the filling contains added sugars and spices.
How Can I Make These Balls Vegan?
To make these protein balls vegan, simply use maple syrup and a plant-based protein powder. Ensure your chocolate is dairy-free as well—many brands offer vegan dark chocolate options!
What If My Mixture Is Too Sticky?
If your dough feels too sticky to roll into balls, simply add a bit more almond flour or oat flour, a tablespoon at a time, until it reaches the right consistency for rolling.
Can I Freeze These Protein Balls?
Yes, you can freeze them! Just make sure they are stored in an airtight container or freezer bag, and they will last for up to 3 months. Thaw them in the fridge before enjoying!